The Z1 Dashboard software currently supports the following racing simulations. This page describes
how the Z1 Dashboard software connects to each of those racing simulators.
Anti Virus Software
Note that sometimes certain anti virus software can interfere with the connection
between the Z1 Dashboard and your sim by either placing the Z1 Dashboard software
in a 'sandbox' where it can't communicate with any other processes, or by preventing
certain ports from being opened. If you find that you are unable to connect to your
racing simulator, then the first place to look is your anti-virus software.
iRacing
iRacing is extremely simple to setup. There is actually nothing you have to do.
Just launch the Z1 Dashboard software and then launch iRacing. The software will
detect that iRacing is running and then display the statistics screen or your favorite
sim racing dashboard.
Assetto Corsa
To get all the information from Assetto Corsa you will need to install the python plugin. The Z1 Dashboard will help
you install this plugin the first time you run the Dashboard.
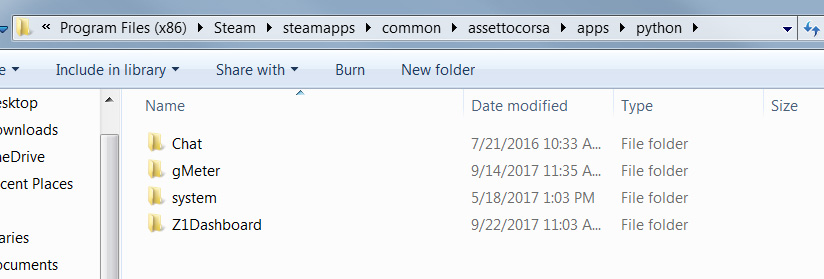
The plugin is located in documents/z1dashboard/plugins/assettocorsa. There you will find a folder called Z1Dashboard. It contains the
plugin 'Z1Dashboard.py'. Copy the entire folder into Program Files (x86)\Steam\steamapps\common\assettocorsa\apps\python.
(You should end up with the Z1Dashboard folder inside the python folder as shown below. And that Z1Dashboard folder
should contains a file called 'Z1Dashboard.py' and two other folders called 'lib32' and 'lib64'.
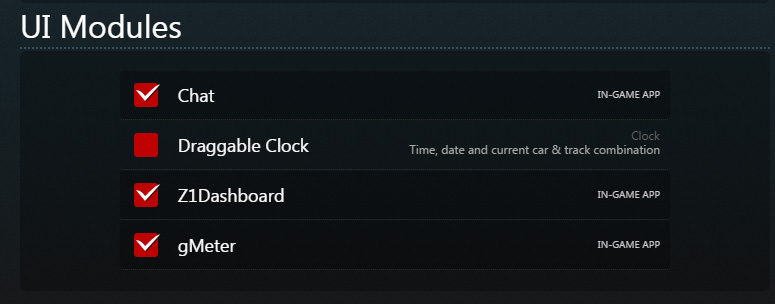
Then when you start Assetto Corsa look in the General settings under the UI Modules and make sure the Z1Dashboard module
is selected, as shown below. Note that the Z1 Dashboard software recognizes Assetto Corsa when you actually go to the
track, and not when you are still selecting the car and track.
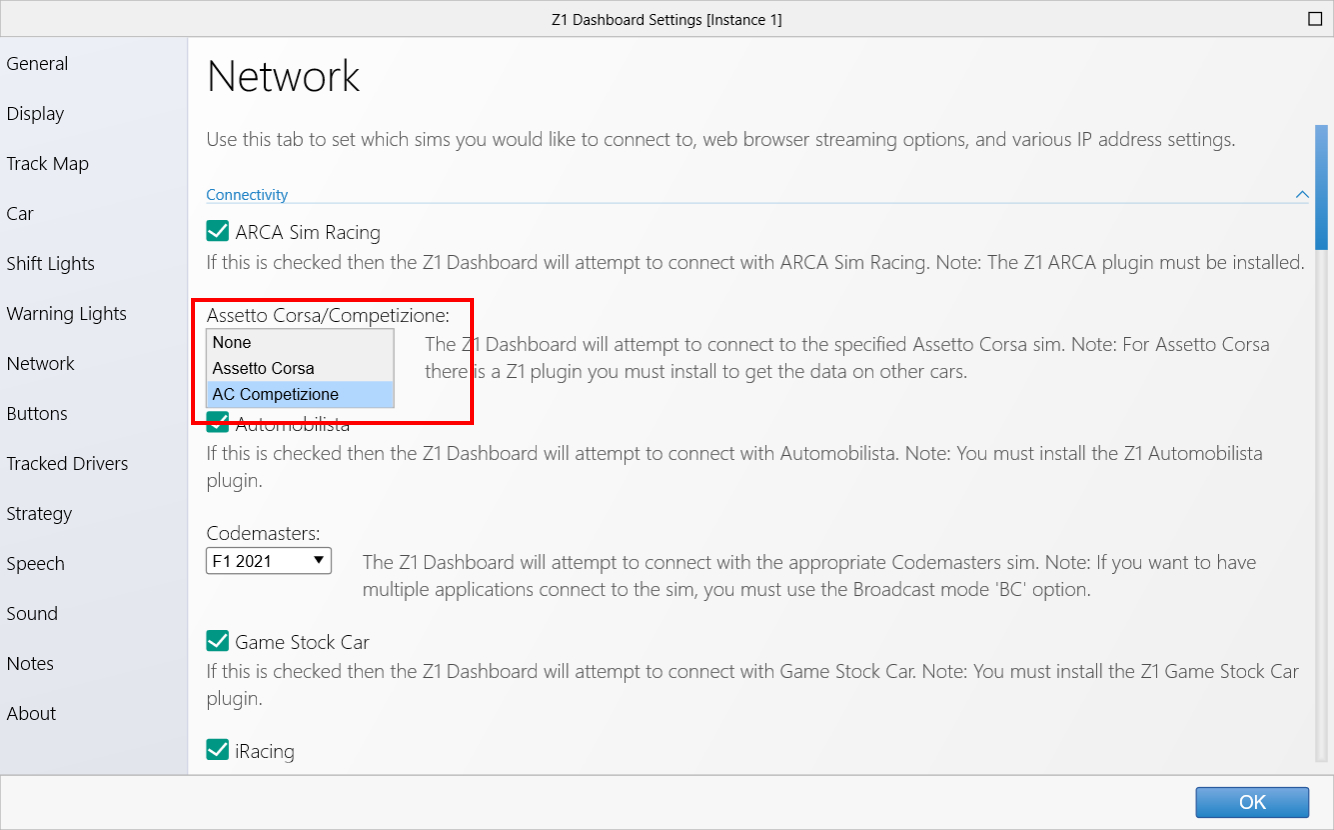
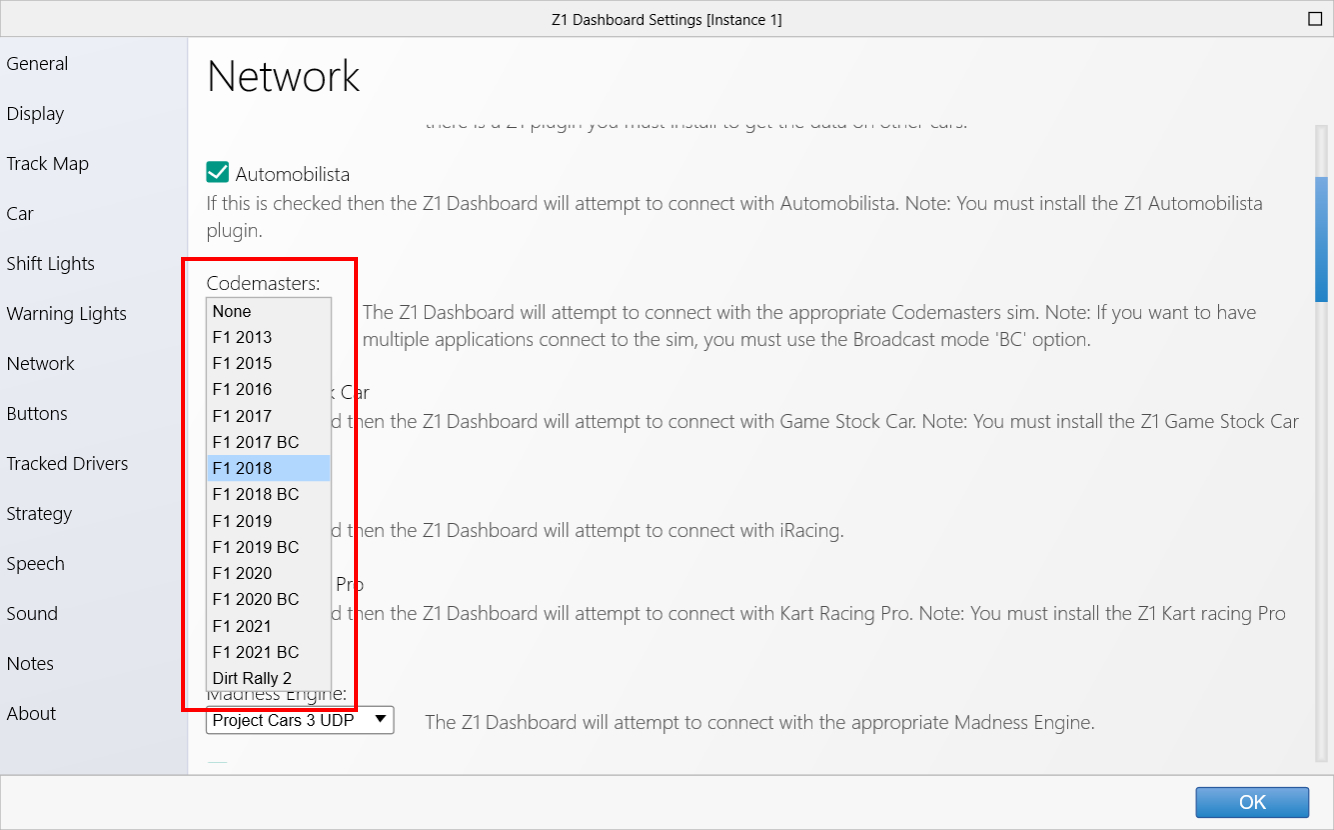
In the Z1 Settings Dialog, click on the Network tab and look under Connectivity. Choose 'Assetto Corsa' from
the Assetto Corsa/Competizione drop down.

Assetto Corsa Competizione
Go in the Z1 Settings Dialog, click on the Network tab and look under Connectivity. Then choose 'AC Competizione'
from the Assetto Corsa/Competizione drop down.
 Displaying Competitor cars from Assetto Corsa Competizione
The Z1 Dashboard can display the competitors from ACC. When the Z1 Dashboard first runs it can help you set this up.
If you want to set it up manually, please do the following. You will need to edit the file
'broadcasting.json' located in documents/Assetto Corsa Competizione/Config. Open the file in Notepad and make sure
it looks like the following:
{
 "updListenerPort": 9000,
 "connectionPassword": "asd",
 "commandPassword": ""
}
Automobilista
The connection to Automobilista requires that you place the Z1Automobilista.dll plugin into the
Automobilista plugin folder. The Z1Automobilista.dll plugin file is located in documents/z1dashboard/plugins/automobilista.
You will need to copy this into the plugins folder of your Automobilista installation.
Once there simply start your Z1 Dashboard software and then start Automobilista.
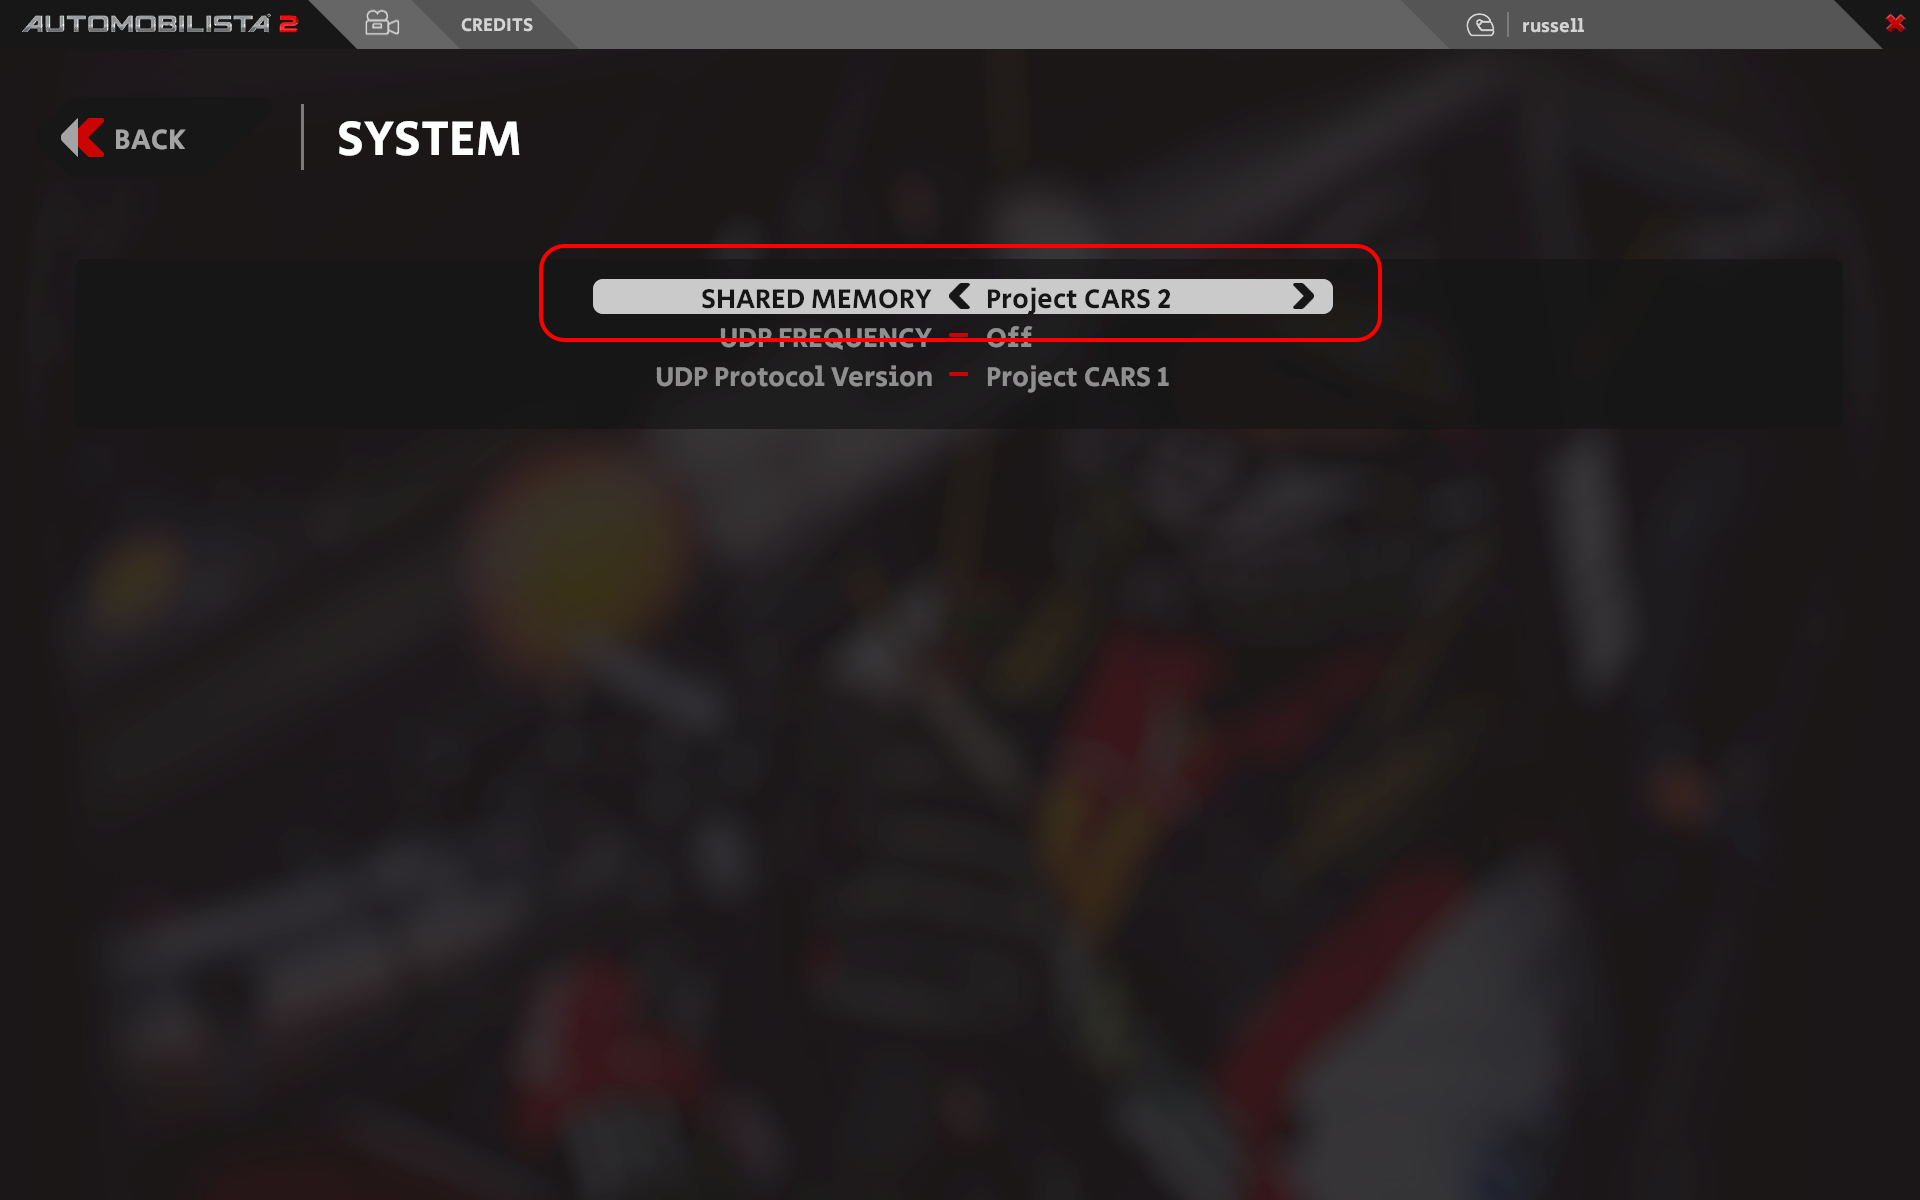
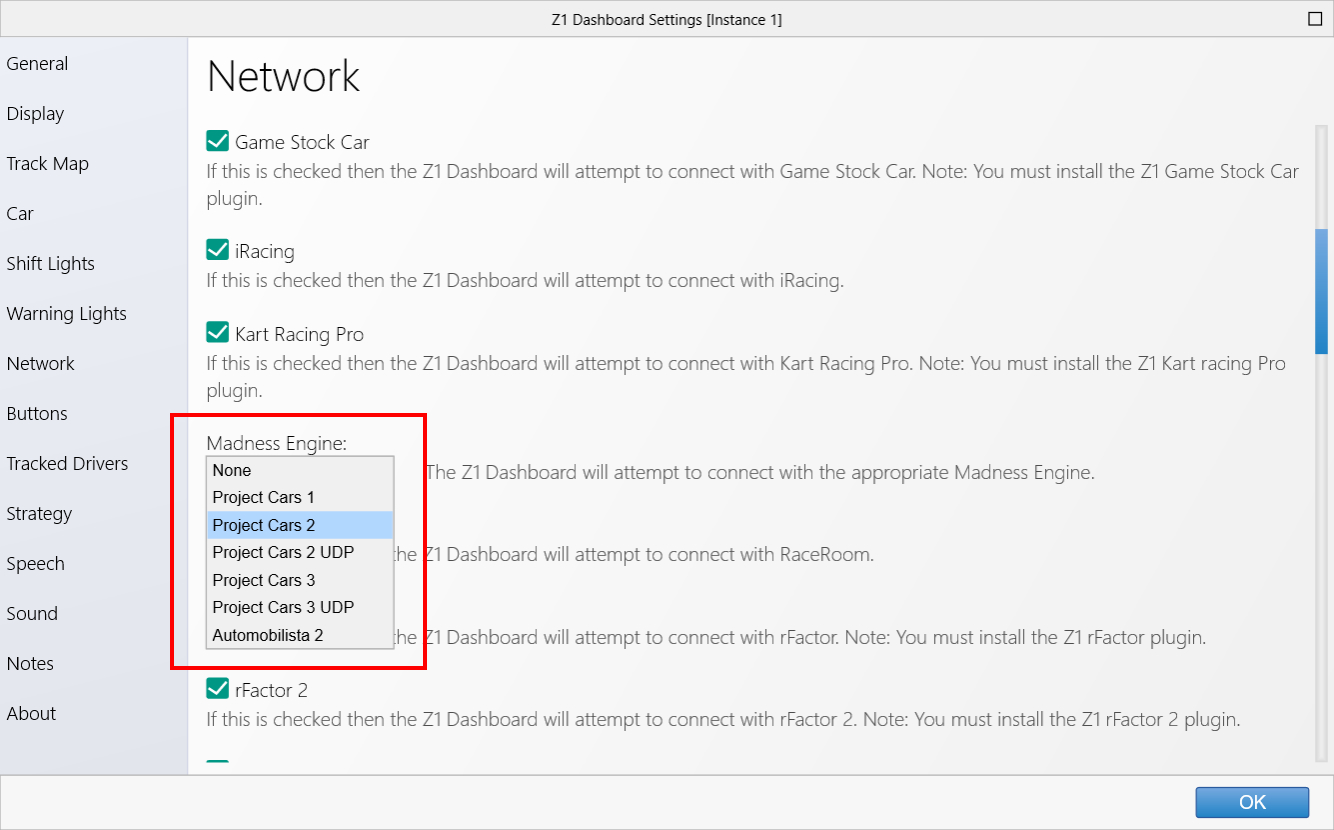
Automobilista 2
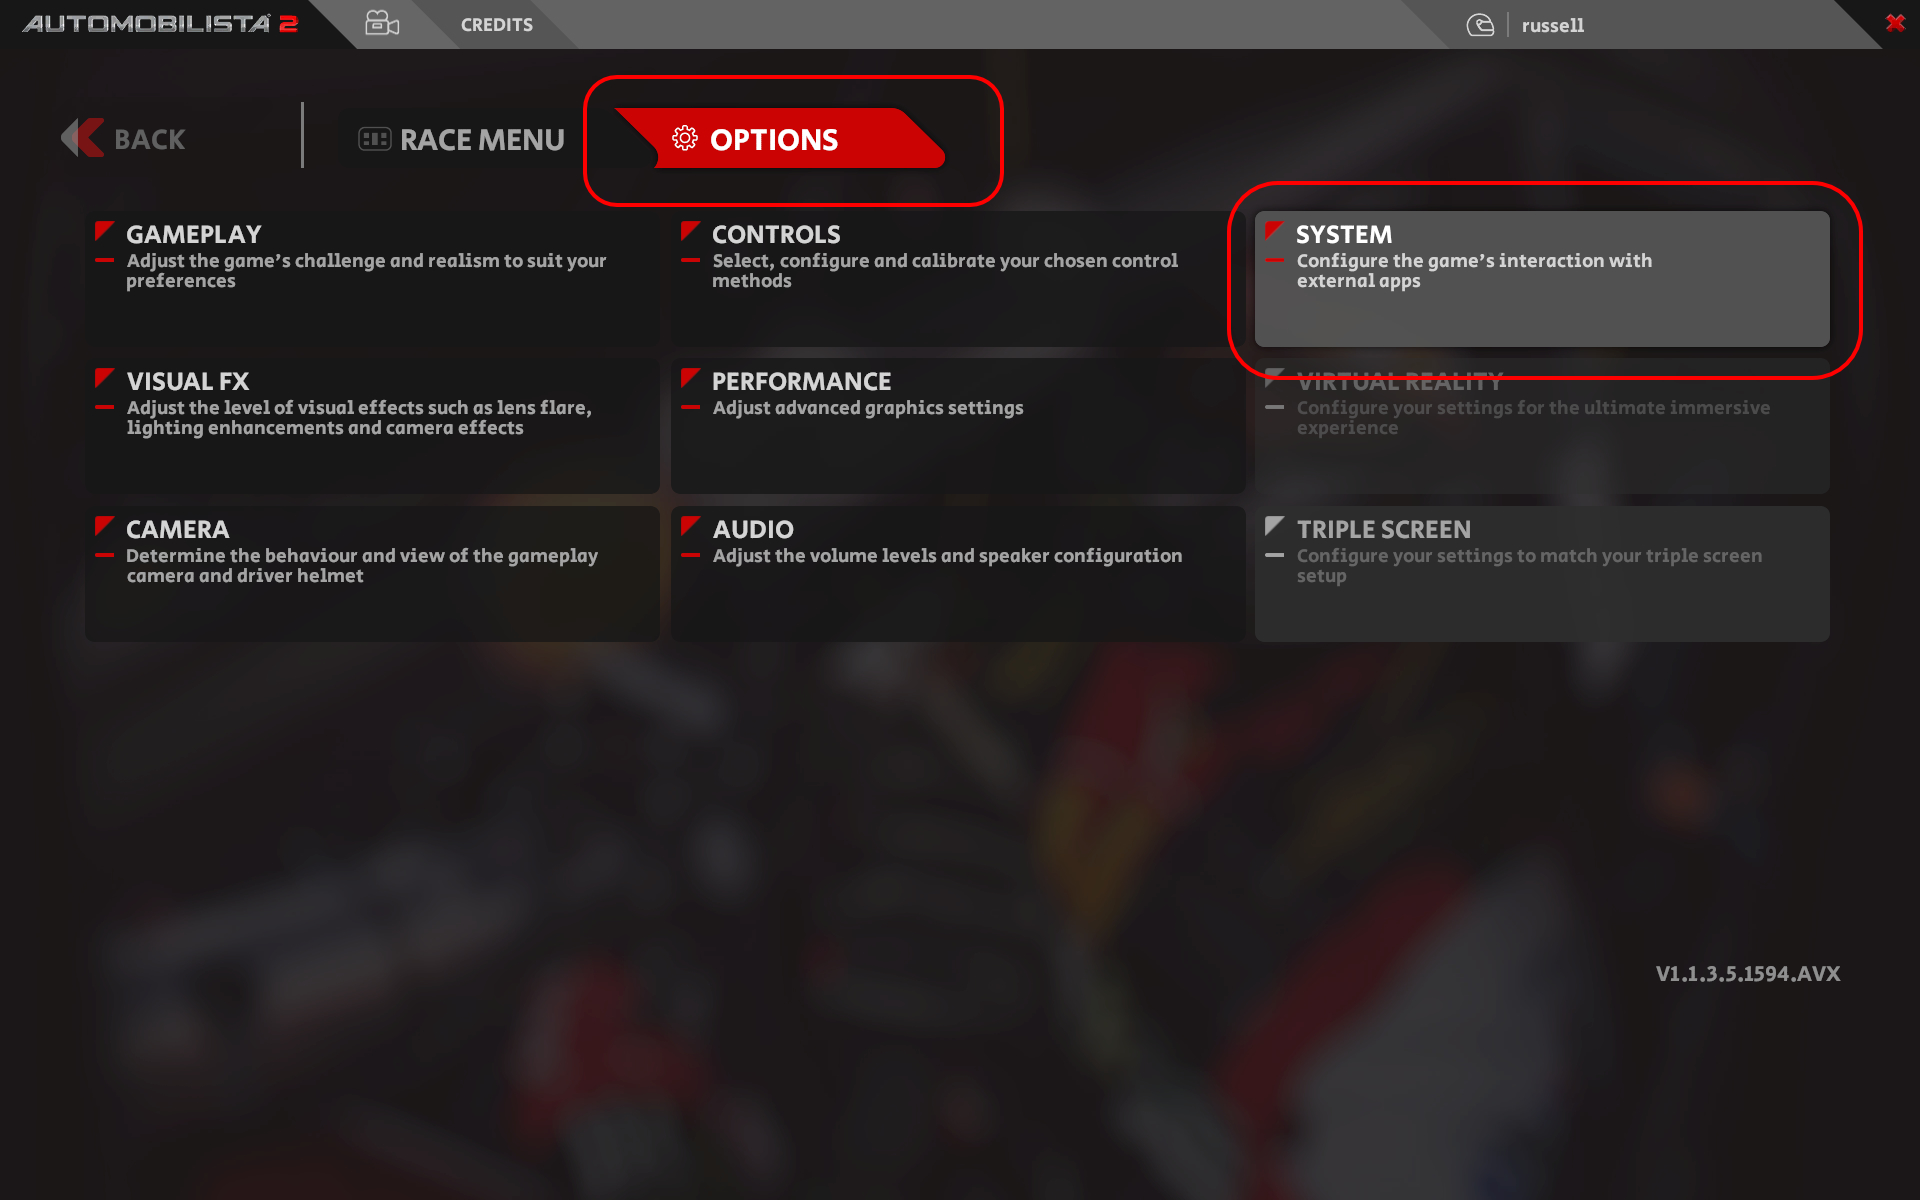
Automobilista 2 requires that you turn on the Shared Memory option in order for the Z1 Dashboard software to successfully communicate
with the sim. This option is located within Automobilista 2 under
OPTIONS. Click on the
SYSTEM
menu to get to the Shared Memory options.
Then on the system screen set the Shared Memory to 'Project Cars 2'. The UDP mode can be set to OFF, unless it is needed by another
application.
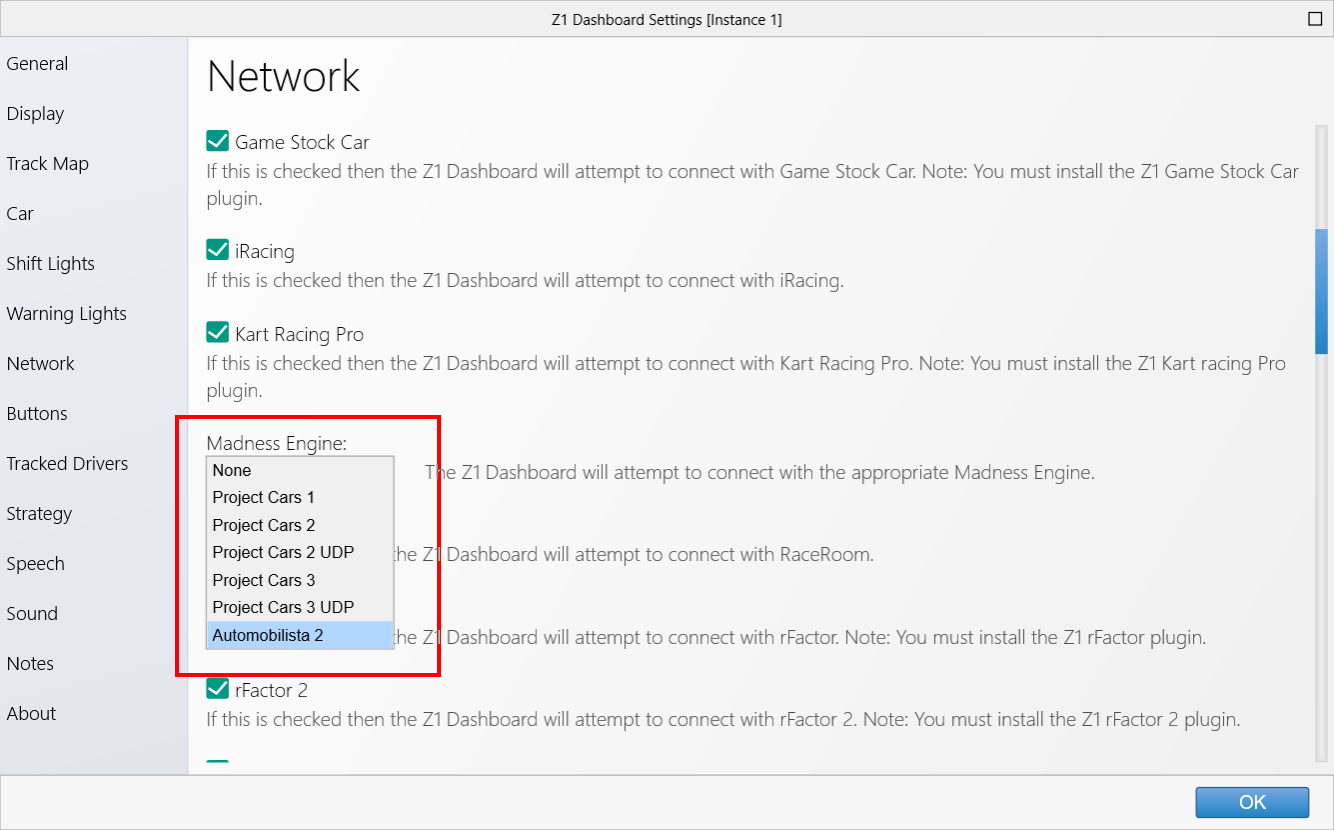
Then go in the Z1 Settings Dialog, click on the Network tab and look under Connectivity. Make sure the
Madness Engine drop down is set to 'Automobilista 2'.
rFactor 1
The connection to rFactor 1 requires that you place the Z1SWRF.dll plugin into the
rFactor 1 plugin folder. The Z1SWRF.dll plugin file is located in documents/z1dashboard/plugins/rfactor1.
You will need to copy this into the plugins folder of your rFactor 1 installation.
Once there simply start your Z1 Dashboard software and then start rFactor 1.
rFactor 2
The connection to rFactor 2 requires that you place the Z1SWRF2.dll or the Z1SWRF264.dll
plugin into the appropriate rFactor 2 plugin folder. Both files are located in the
documents/z1dashboard/plugins/rfactor2 folder. The Z1SWRF2.dll is for 32 bit versions
of rFactor 2. The Z1SWRF264.dll is for 64 bit versions of rFactor 2.
Steam Installation:
The rFactor 2 32 bit plugin folder is located at \Program Files (x86)\Steam\steamapps\common\rFactor 2\Bin32\Plugins
The rFactor 2 64 bit plugin folder is located at \Program Files (x86)\Steam\steamapps\common\rFactor 2\Bin64\Plugins
Previous Installations:
The rFactor 2 32 bit plugin folder is located at \Program Files (x86)\rFactor2\Bin32\Plugins.
The rFactor 2 64 bit plugin folder is located at \Program Files (x86)\rFactor2\Bin64\Plugins.
You will need to copy the appropriate plugin into the plugins folder of your rFactor 2 installation.
Once there simply start your Z1 Dashboard software and then start rFactor 2.
Note that there will be about a 10-20 second delay when you get in the car before rFactor 2
will start broadcasting data. This results in the software not detecting that you are in
the car for those 10-20 seconds. You will notice a small 'plug' icon at the top left
of your rFactor window which will shrink away when rFactor 2 starts to broadcast the data.
RaceRoom
RaceRoom is extremely simple to setup. There is actually nothing you have to do.
Just launch the Z1 Dashboard software and then launch RaceRoom. The software will
detect that RaceRoom is running and then display the statistics screen or your favorite
sim racing dashboard.
ARCA Sim Racing
The connection to ARCA Sim Racing requires that you place the Z1SWArca.dll plugin into the
ARCA Sim Racing plugin folder. The Z1SWArca.dll plugin file is located in documents/z1dashboard/plugins/ARCA Sim Racing.
You will need to copy this into the plugins folder of your ARCA Sim Racing installation.
Once there simply start your Z1 Dashboard software and then start ARCA Sim Racing.
Game Stock Car
The connection to Game Stock Car requires that you place the Z1SWGSC.dll plugin into the
Game Stock Car plugin folder. The Z1SWGSC.dll plugin file is located in documents/z1dashboard/plugins/Game Stock Car.
You will need to copy this into the plugins folder of your Game Stock Car installation.
Once there simply start your Z1 Dashboard software and then start Game Stock Car.
Kart Racing Pro
The connection to Kart Racing Pro requires that you place the Z1SWKRP14.dlo file into the
Kart Racing Pro plugin folder. The Z1SWKRP14.dlo file is located in documents/z1dashboard/plugins/Kart Racing
Pro. You will need to copy this file into your Kart Racing Pro plugins folder. Once done
simply start your Z1 Dashboard software and then start Kart Racing Pro.
SimBin sims
There is nothing you need to do to connect to your favorite SimBin sim. Just start the sim
and start the Z1 Dashboard software. When you get in the car the Z1 Dashboard will recognize
the sim and display the dashboard. Note that as the data output by SimBin sims is very limited
many of the functions included in the Z1 Dashboard software may not be supported by the sim.
Note that as SimBin sims do not output the type of car being driven that the Z1 Dashboard has
to do some guesswork to determine which car is being used. You can still customize the dashboard
for the car, but note that not every car may be uniquely identified, resulting in the same dashboard
being used for multiple cars.
Also note that as SimBin does not output when the sim has exited, the Z1 Dashboard assumes that
if the sim does not output any new data within 10 seconds that it has exited. This means that
if you are in the process of selecting an event that the Z1 Dashboard might un-connect from the
sim and then instantly reconnect. This is normal behavior.
Project CARS
Project CARS requires that you turn on the
Use Shared Memory option in order for the Z1
Dashboard software to successfully communicate with Project CARS. This option is located within
Project CARS under
Help & Options. Choose
Visuals and the
Use Shared Memory
option is located in the Hardware menu block. Make sure this is set to Yes.
Once done simply start your Z1 Dashboard software and it will recognize Project CARS.
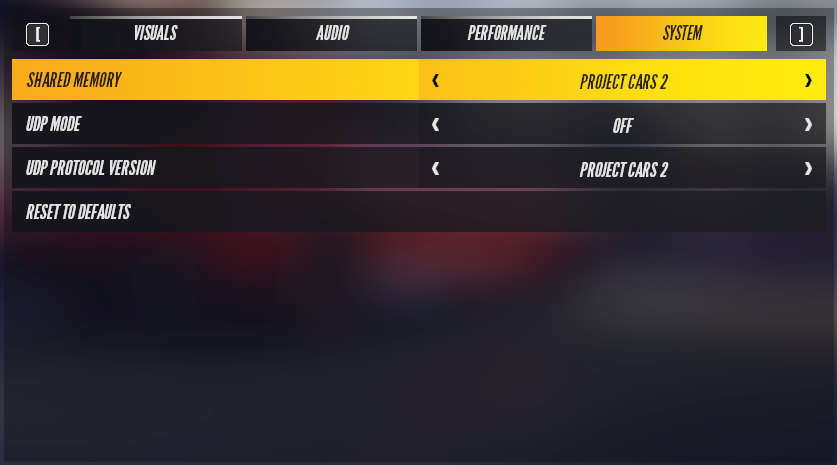
Project CARS 2 Shared memory
Project CARS 2 requires that you turn on the Shared Memory option in order for the Z1 Dashboard software to successfully communicate
with Project CARS 2 using Shared Memory. This option is located within Project CARS 2 under
Options. Click on the
System
block to get to the Shared Memory options.
Then on the next screen you will see options for Shared Memory, UDP Frequency and UDP Protocol Version. You can set UDP
Frequency to Off, unless it is needed by another application.
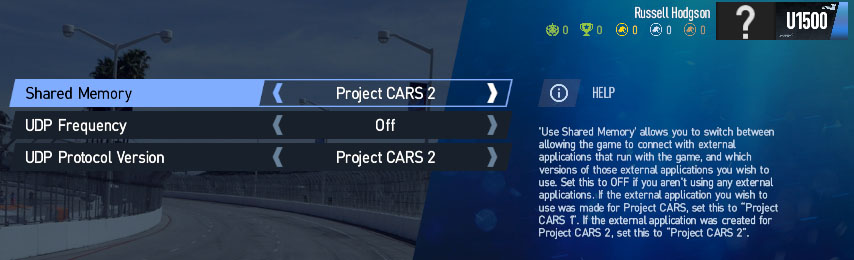
Set
Shared Memory to 'Project Cars 2'.
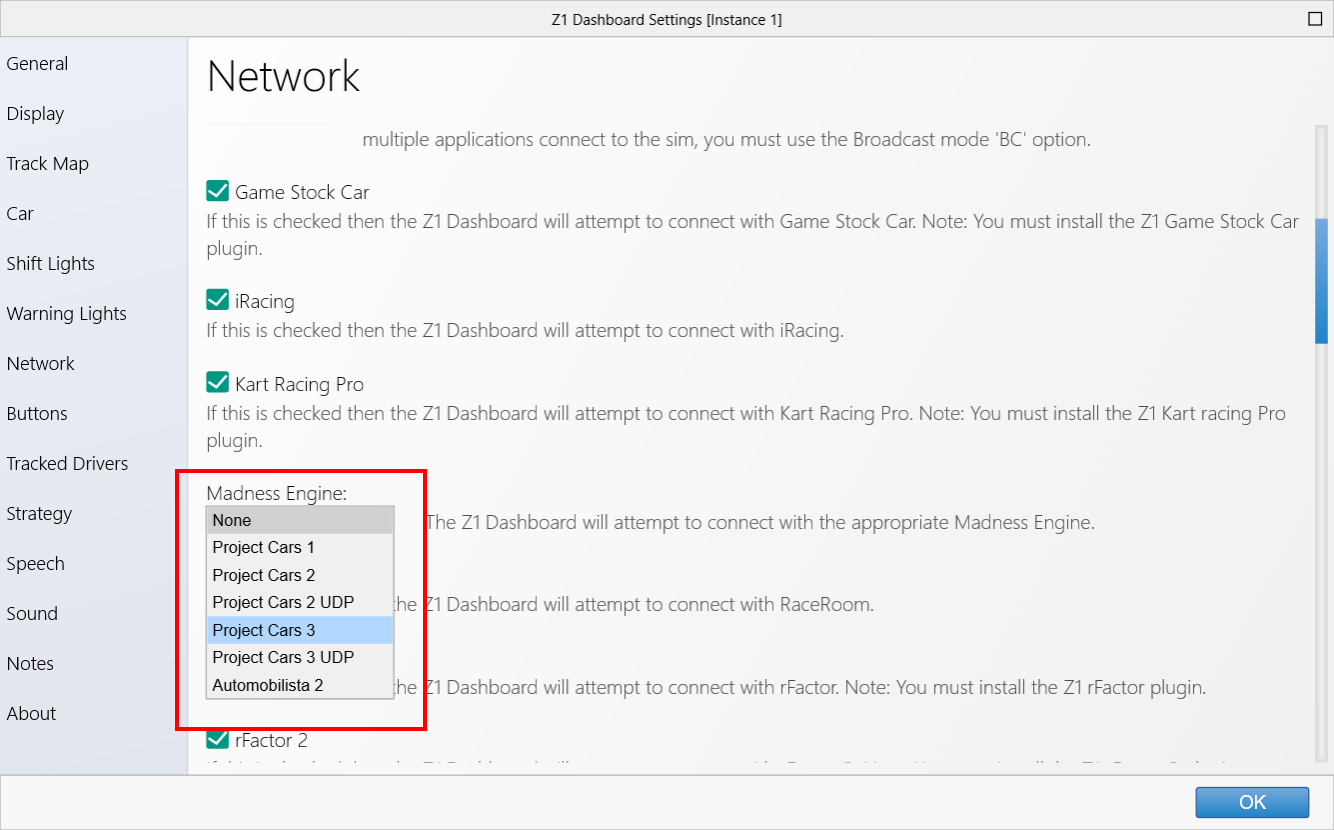
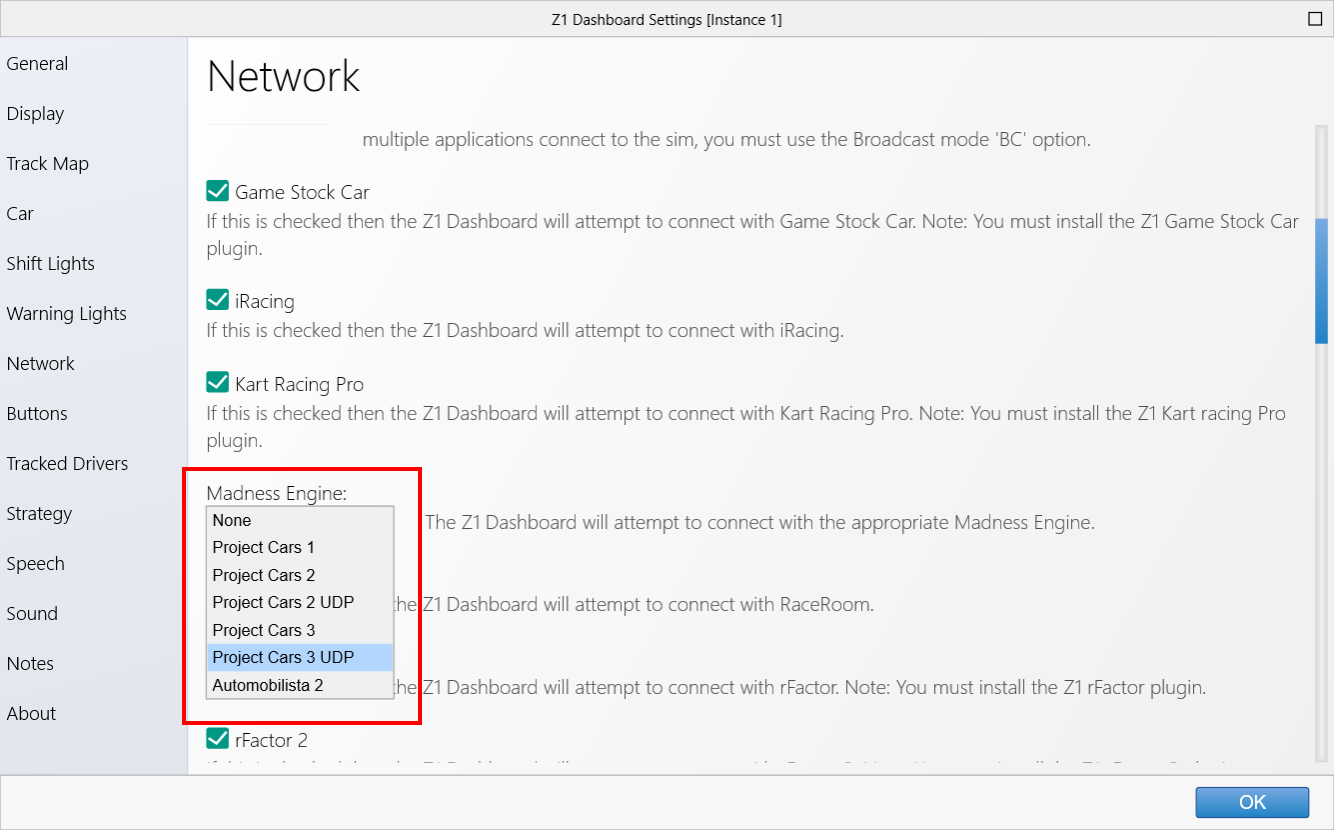
Then go to the Z1 Settings Dialog, click on the Network tab and look under Connectivity. Make sure the Madness Engine
drop down is set to 'Project Cars 2'.
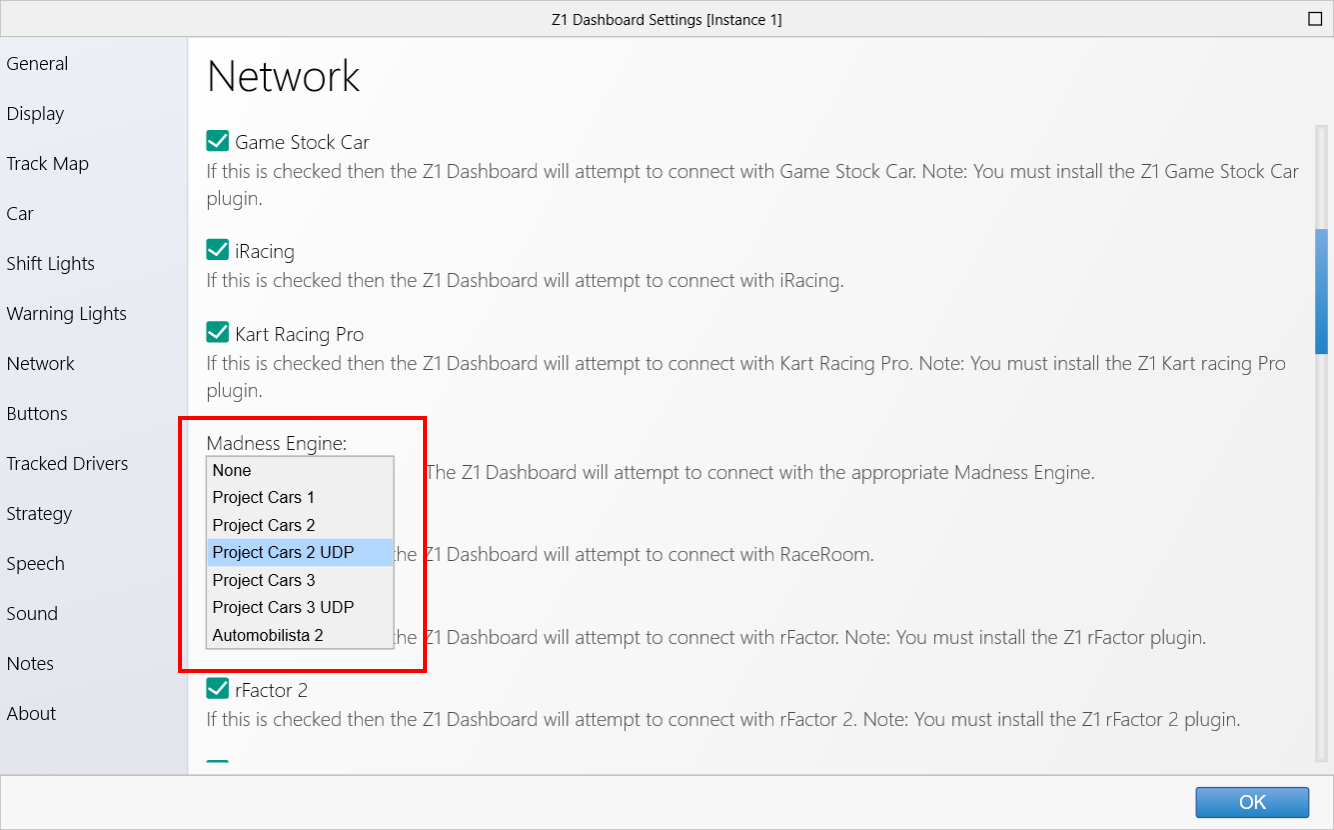
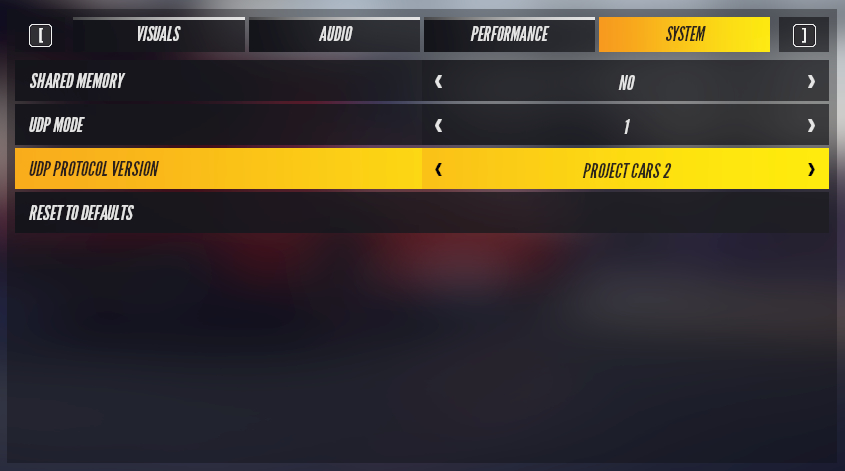
Project CARS 2 UDP
Project CARS 2 requires that you turn on the UDP stream in order for the Z1 Dashboard software to successfully communicate
with Project CARS 2 using UDP. This option is located within Project CARS 2 under
Options. Click on the
System
block to get to the UDP options.
Then on the next screen you will see options for Shared Memory, UDP Frequency and UDP Protocol Version. You can set Shared
Memory to No, unless it is needed by another application.

Set
UDP Frequency to the lowest number your system will support. 1 outputs the data at the fastest rate, giving you
better resolution especially when recording telemetry for the Analyzer. Some system may not be able to stream the data fast
enough to support the lower numbers, so if you find the Z1 is running behind the sim, try a higher number.
Set
UDP Protocol Version to 'Project Cars 2'.
Then go in the Z1 Settings Dialog, click on the Network tab and look under Connectivity. Make sure the Madness Engine
drop down is set to 'Project Cars 2 UDP'.
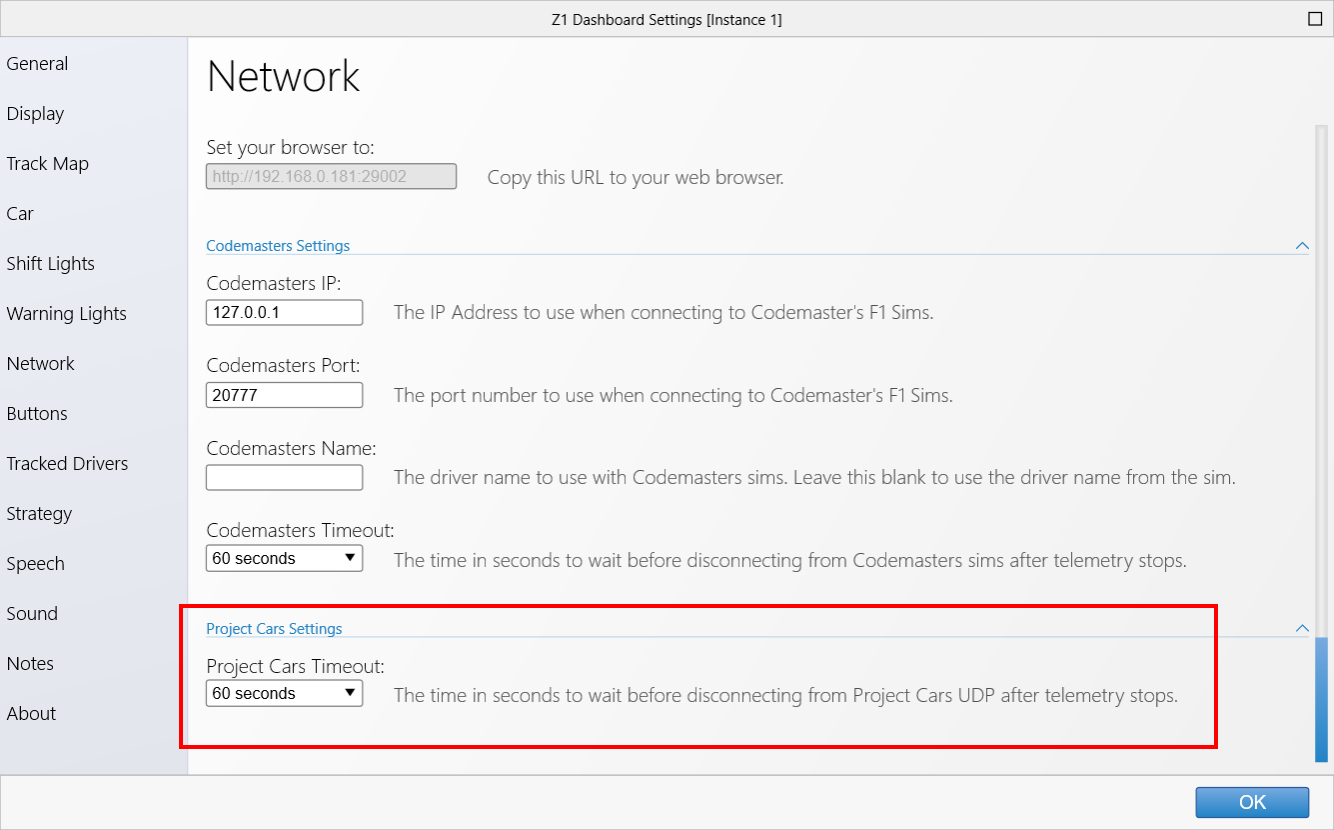
Note that due to how Project Cars 2 sends the UDP data it does not always send the signal that the sim has exited when you exit
the sim. However it does cease sending telemetry data when it exits. Unfortunately it also ceases sending telemetry data if it
is paused. The sim will pause whenever the sim loses focus. This can happen if you open the Z1 Dashboard settings dialog. Because
we don't want the Z1 to disconnect whenever we open the settings dialog the Z1 will wait one minute (60 seconds) after the telemetry
ceases before assuming the sim has exited. You can adjust this setting by changing the value in the Project Cars Timeout drop down.
Note that we also highly recommend that you have the Z1 Dashboard running before you start up the sim. Project Cars 2 sends out
UDP data in a very specific order. If you start the Z1 Dashboard after the sim has started it may miss important data, such as
the car or track being used, or competitor data.
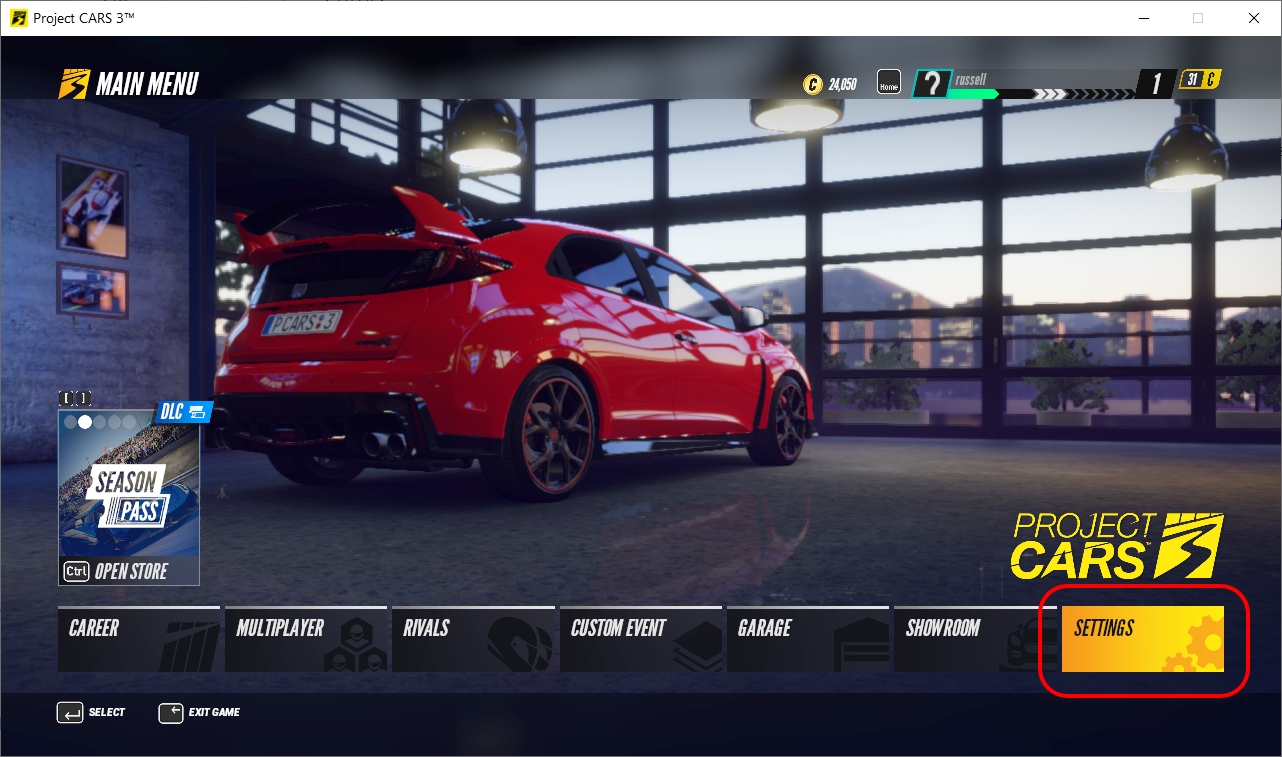
Project CARS 3 Shared memory
Project CARS 3 requires that you turn on the Shared Memory option in order for the Z1 Dashboard software to successfully communicate
with Project CARS 3 using Shared Memory. This option is located within Project CARS 3 under
Settings. Click on the
Settings
menu to get to the Shared Memory options.
Then on the settings screen you will need to scroll to the right until you see the System tab. Click on that tab to view the
Shared Memory options. Set the Shared Memory to 'Project cars 2'. The UDP mode can be set to OFF, unless it is needed by another
application.
Set
Shared Memory to 'Project Cars 2'.
Then go in the Z1 Settings Dialog, click on the Network tab and look under Connectivity. Make sure the Madness Engine
drop down is set to 'Project Cars 3'.
Project CARS 3 UDP
Project CARS 3 requires that you turn on the UDP Stream in order for the Z1 Dashboard software to successfully communicate
with Project CARS 3 using UDP. This option is located within Project CARS 3 under
Settings. Click on the
Settings
menu to get to the UDP options.
Then on the next screen you will see options for Shared Memory, UDP Mode and UDP Protocol Version. You can set Shared
Memory to No, unless it is needed by another application.
Set
UDP Mode to the lowest number your system will support. 1 outputs the data at the fastest rate, giving you
better resolution especially when recording telemetry for the Analyzer. Some system may not be able to stream the data fast
enough to support the lower numbers, so if you find the Z1 is running behind the sim, try a higher number.
Set
UDP Protocol Version to 'Project Cars 2'.
Then go in the Z1 Settings Dialog, click on the Network tab and look under Connectivity. Make sure the Madness Engine
drop down is set to 'Project Cars 3 UDP'.
Note that due to how Project Cars 3 sends the UDP data it does not always send the signal that the sim has exited when you exit
the sim. However it does cease sending telemetry data when it exits. Unfortunately it also ceases sending telemetry data if it
is paused. The sim will pause whenever the sim loses focus. This can happen if you open the Z1 Dashboard settings dialog. Because
we don't want the Z1 to disconnect whenever we open the settings dialog the Z1 will wait one minute (60 seconds) after the telemetry
ceases before assuming the sim has exited. You can adjust this setting by changing the value in the Project Cars Timeout drop down.
Note that we also highly recommend that you have the Z1 Dashboard running before you start up the sim. Project Cars 3 sends out
UDP data in a very specific order. If you start the Z1 Dashboard after the sim has started it may miss important data, such as
the car or track being used, or competitor data.
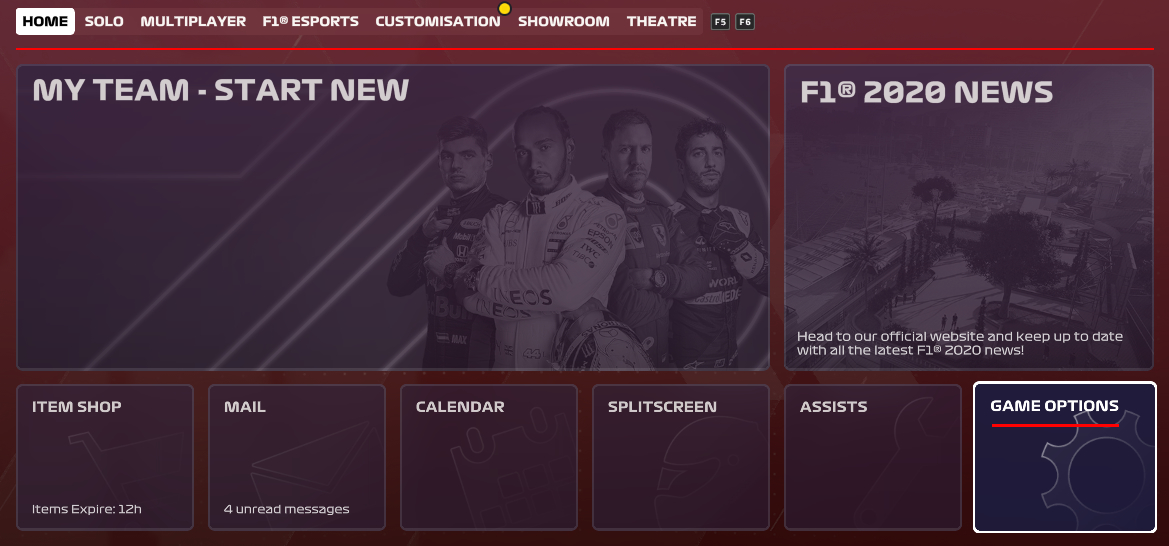
Codemasters F1 2020
F1 2020 requires that you turn on the UDP stream in order for the Z1 Dashboard software to successfully communicate
with F1 2020 using UDP. This option is located within F1 2020 under
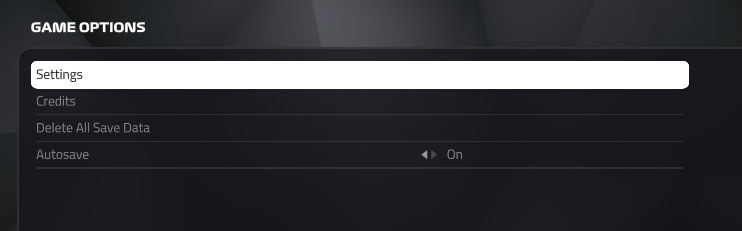
Game Options.
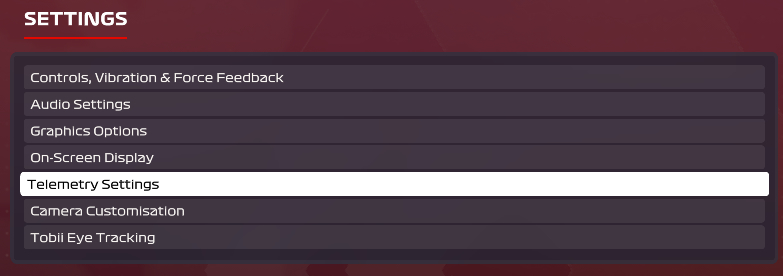
In Game Options, click on the
Settings option to get to the settings screen.
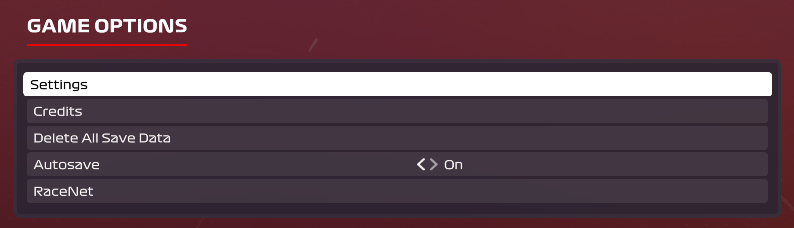
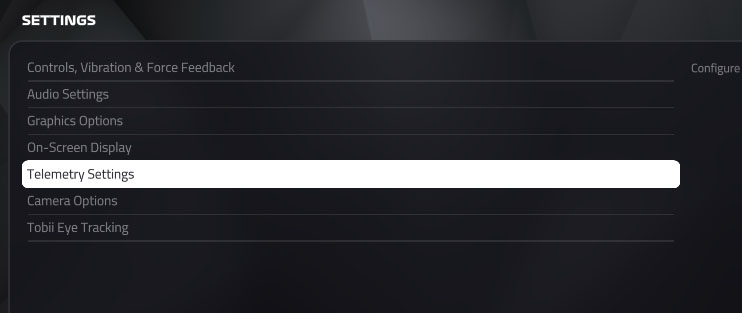
Once in the settings screen, scroll down to the
Telemetry Settings line and select it.
Then on the next screen you will see the various UDP options.
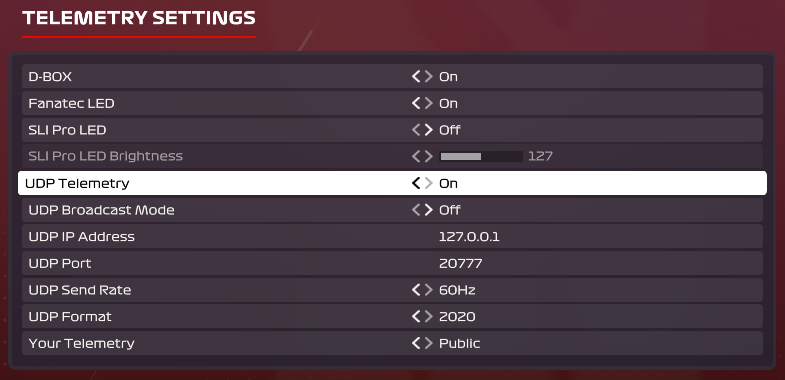
Set the
UDP Telemetry option to
On. If you are using other applications that require UDP access then you'll
need to set
UDP Broadcast Mode to
On. Otherwise set it to
Off. The
UDP Send Rate should be as
high as your system can handle. You may need to experiment with this value to get the option that best suits your system.
The
UDP Format should be set to
2020.
The first three lines,
D-Box,
Fanatec LED and
SLI Pro LED should be set to Off unless you need them to work
with their respective hardware.
Then go in the Z1 Settings Dialog, click on the Network tab and look under Connectivity. Make sure the Codemasters drop down
is set to 'F1 2020'. Note if you selected broadcast mode in the sim's settings then you should choose 'F1 2020 BC'.
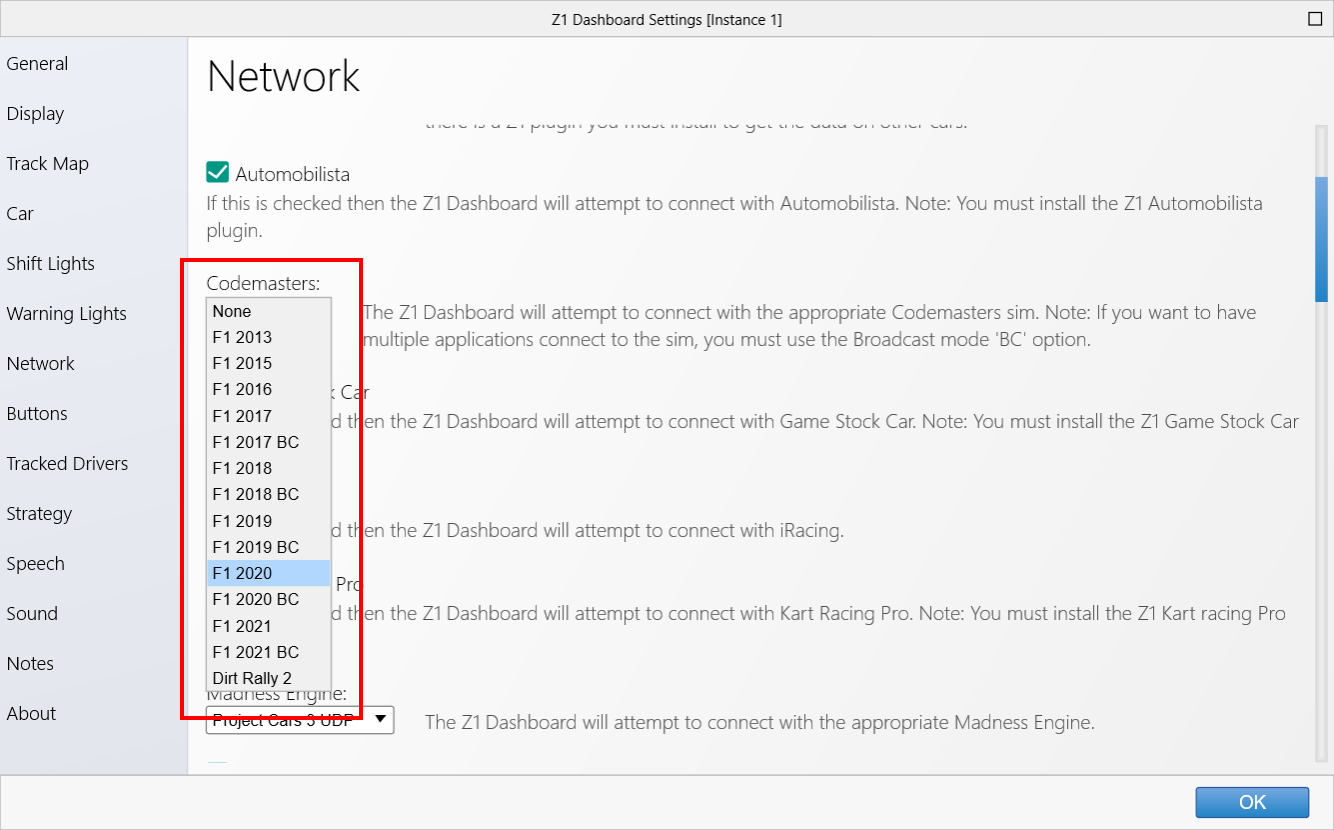
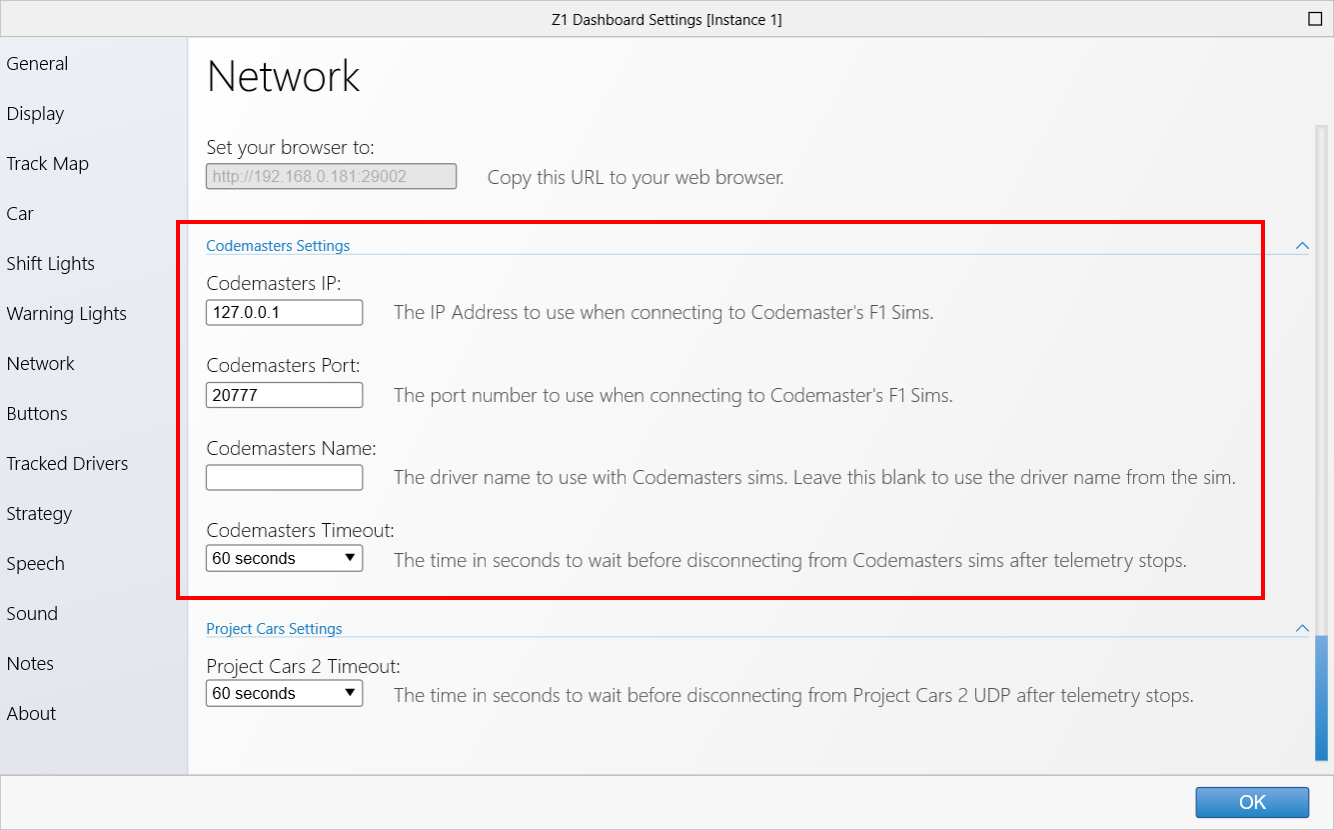
The Codemasters IP value should match UDP IP Address from the F1 2020 Telemetry Setings.
The Codemaster Port value should match UDP Port from the F1 2020 Telemetry Settings.
 Note that due to how F1 2020 sends the UDP data it does not always send the signal that the sim has exited when you exit
the sim.
Note that due to how F1 2020 sends the UDP data it does not always send the signal that the sim has exited when you exit
the sim. However it does cease sending telemetry data when it exits. Unfortunately it also ceases sending telemetry data if it
is paused. The sim will pause whenever the sim loses focus. This can happen if you open the Z1 Dashboard settings dialog. Because
we don't want the Z1 to disconnect whenever we open the settings dialog the Z1 will wait one minute (60 seconds) after the telemetry
ceases before assuming the sim has exited. You can adjust this setting by changing the value in the Codemasters Timeout drop down.
Note that we also highly recommend that you have the Z1 Dashboard running before you start up the sim. F1 2020 sends out
UDP data in a very specific order. If you start the Z1 Dashboard after the sim has started it may miss important data, such
as the car or track being used, or competitor data.
Codemasters F1 2019
F1 2019 requires that you turn on the UDP stream in order for the Z1 Dashboard software to successfully communicate
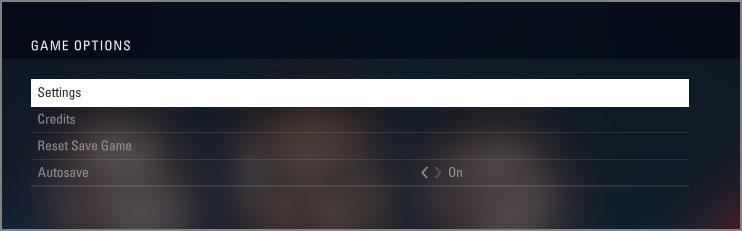
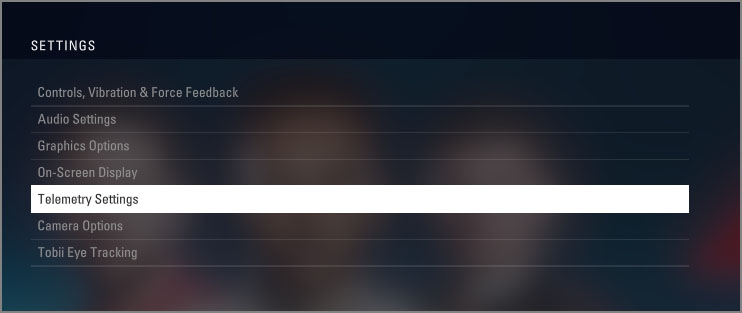
with F1 2019 using UDP. This option is located within F1 2019 under
Game Options. Click on the
Settings
option to get to the settings screen.
Once in the settings screen, scroll down to the
Telemetry Settings line and select it.
Then on the next screen you will see the various UDP options.
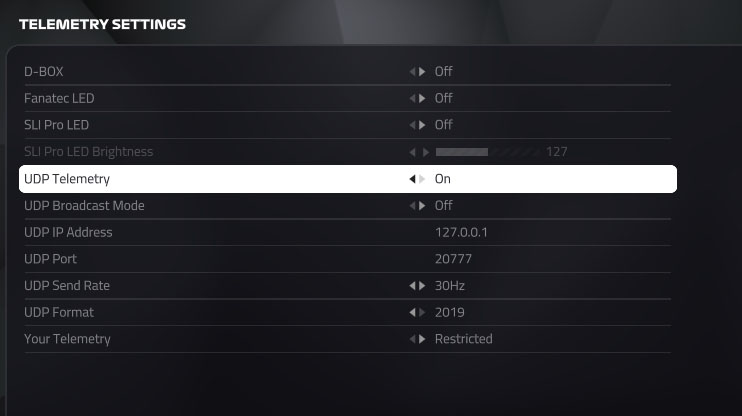
Set the
UDP Telemetry option to
On. If you are using other applications that require UDP access then you'll
need to set
UDP Broadcast Mode to
On. Otherwise set it to
Off. The
UDP Send Rate should be as
high as your system can handle. You may need to experiment with this value to get the option that best suits your system.
The
UDP Format should be set to
2019.
The first three lines,
D-Box,
Fanatec LED and
SLI Pro LED should be set to Off unless you need them to work
with their respective hardware.
Then go in the Z1 Settings Dialog, click on the Network tab and look under Connectivity. Make sure the Codemasters drop down
is set to 'F1 2019'. Note if you selected broadcast mode in the sim's settings then you should choose 'F1 2019 BC'.
 Note that due to how F1 2019 sends the UDP data it does not always send the signal that the sim has exited when you exit
the sim.
Note that due to how F1 2019 sends the UDP data it does not always send the signal that the sim has exited when you exit
the sim. However it does cease sending telemetry data when it exits. Unfortunately it also ceases sending telemetry data if it
is paused. The sim will pause whenever the sim loses focus. This can happen if you open the Z1 Dashboard settings dialog. Because
we don't want the Z1 to disconnect whenever we open the settings dialog the Z1 will wait one minute (60 seconds) after the telemetry
ceases before assuming the sim has exited. You can adjust this setting by changing the value in the Codemasters Timeout drop down.
Note that we also highly recommend that you have the Z1 Dashboard running before you start up the sim. F1 2019 sends out
UDP data in a very specific order. If you start the Z1 Dashboard after the sim has started it may miss important data, such
as the car or track being used, or competitor data.
Codemasters F1 2018
F1 2018 requires that you turn on the UDP stream in order for the Z1 Dashboard software to successfully communicate
with F1 2018 using UDP. This option is located within F1 2018 under
Game Options. Click on the
Settings
option to get to the settings screen.
Once in the settings screen, scroll down to the
Telemetry Settings line and select it.
Then on the next screen you will see the various UDP options.
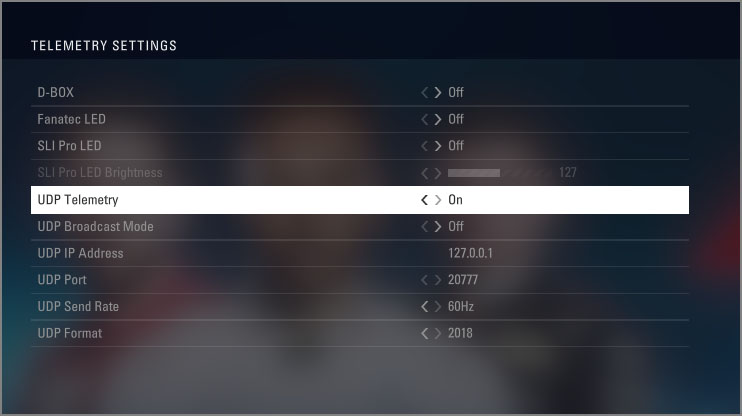
Set the
UDP Telemetry option to
On. If you are using other applications that require UDP access then you'll
need to set
UDP Broadcast Mode to
On. Otherwise set it to
Off. The
UDP Send Rate should be as
high as your system can handle. You may need to experiment with this value to get the option that best suits your system.
The
UDP Format should be set to
2018.
The first three lines,
D-Box,
Fanatec LED and
SLI Pro LED should be set to Off unless you need them to work
with their respective hardware.
Then go in the Z1 Settings Dialog, click on the Network tab and look under Connectivity. Make sure the Codemasters drop down
is set to 'F1 2018'. Note if you selected broadcast mode in the sim's settings then you should choose 'F1 2018 BC'.
 Note that due to how F1 2018 sends the UDP data it does not always send the signal that the sim has exited when you exit
the sim.
Note that due to how F1 2018 sends the UDP data it does not always send the signal that the sim has exited when you exit
the sim. However it does cease sending telemetry data when it exits. Unfortunately it also ceases sending telemetry data if it
is paused. The sim will pause whenever the sim loses focus. This can happen if you open the Z1 Dashboard settings dialog. Because
we don't want the Z1 to disconnect whenever we open the settings dialog the Z1 will wait one minute (60 seconds) after the telemetry
ceases before assuming the sim has exited. You can adjust this setting by changing the value in the Codemasters Timeout drop down.
Note that we also highly recommend that you have the Z1 Dashboard running before you start up the sim. F1 2018 sends out
UDP data in a very specific order. If you start the Z1 Dashboard after the sim has started it may miss important data, such
as the car or track being used, or competitor data.
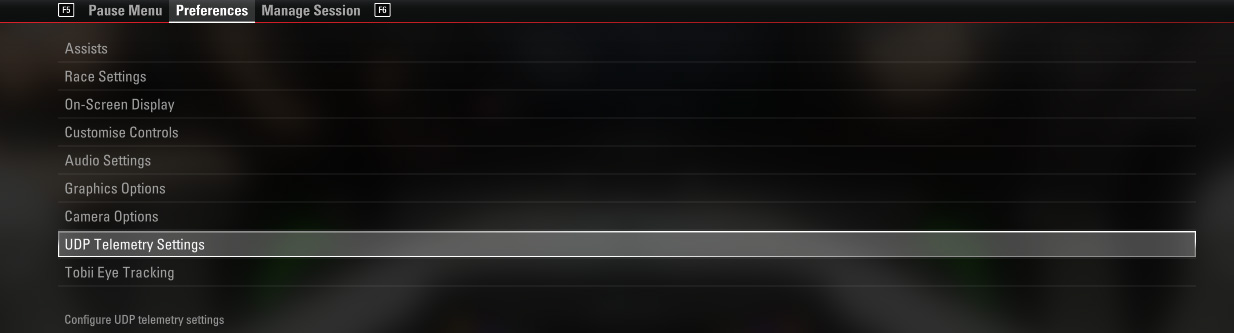
Codemasters F1 2017
Codemasters uses a UDP connection to communicate with the Z1 Dashboard software. First make sure that the Z1 software
is set to scan for the F1 2017 sim. This is done ind the Network tab of the Z1's settings dialog. Second, you will need
to tell the sim to send the UDP data. To do so go to the preferences menu tab and select UDP Telemetry Settings as shown
below.
Then make sure the UDP Telemetry option is set to On. Set the Send Rate as high as possible. 60 Hz is currently the
highest setting.
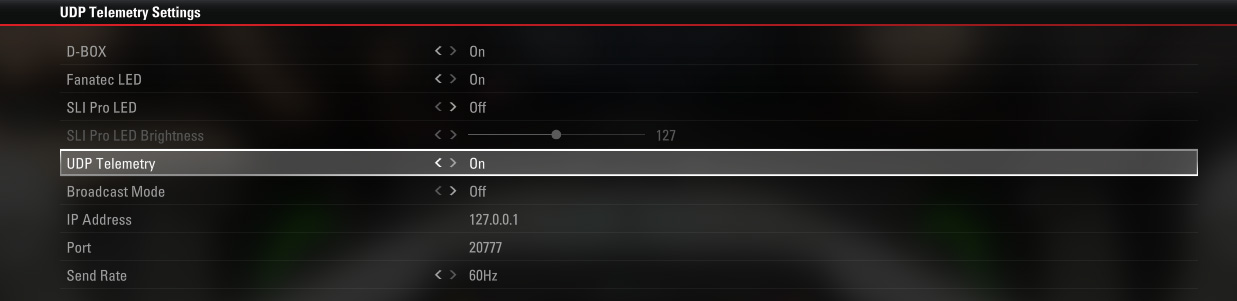
If you are having difficulties in connecting, then ensure that your anti virus software or
firewall is not blocking the IP Address or Port. By default these are IP Address 127.0.0.1
and Port 20777. You can change these if necessary in the Network tab of the Z1 Dashboard's settings dialog.
Codemasters F1 2016
Codemasters uses a UDP connection to communicate with the Z1 Dashboard software. First make sure that the Z1 software
is set to scan for the F1 2016 sim. This is done ind the Network tab of the Z1's settings dialog. Second, you will need
to update your hardware_settings_config.xml file for the sim in order to turn on the data feed.
This file is located in Documents\My Games\FormulaOne2016\hardwaresettings.
Find this line:
                        <motion>

                        ...

                        <udp enabled="false" ip="127.0.0.1" port="20777" />

                        ...

                        </motion>
and update it to be:
                        <motion>

                        ...

                        <udp enabled="true" ip="127.0.0.1" port="20777" />

                        ...

                        </motion>
If you are having difficulties in connecting, then ensure that your anti virus software or
firewall is not blocking the IP Address or Port. By default these are IP Address 127.0.0.1
and Port 20777. You can change these if necessary in the Network tab of the Z1 Dashboard's settings dialog.
Note that sometimes with Codemasters sims, there can be a delay of data through the UDP connection
making the Z1 Dashboard lag behind by about a second or two. If you find this happening please
make sure you do not have any firewall, anti-virus software, or other devices that might
be filtering or slowing the data.
Codemasters F1 2015
Codemasters uses a UDP connection to communicate with the Z1 Dashboard software. First make sure that the Z1 software
is set to scan for the F1 2015 sim. This is done ind the Network tab of the Z1's settings dialog. Second, you will need
to update your hardware_settings_config.xml file for the sim in order to turn on the data feed.
This file is located in Documents\My Games\FormulaOne2015\hardwaresettings.
Find this line:
                        <motion>

                        ...

                        <udp enabled="false" ip="127.0.0.1" port="20777" />

                        ...

                        </motion>
and update it to be:
                        <motion>

                        ...

                        <udp enabled="true" ip="127.0.0.1" port="20777" />

                        ...

                        </motion>
If you are having difficulties in connecting, then ensure that your anti virus software or
firewall is not blocking the IP Address or Port. By default these are IP Address 127.0.0.1
and Port 20777. You can change these if necessary in the Network tab of the Z1 Dashboard's settings dialog.
Note that sometimes with Codemasters sims, there can be a delay of data through the UDP connection
making the Z1 Dashboard lag behind by about a second or two. If you find this happening please
make sure you do not have any firewall, anti-virus software, or other devices that might
be filtering or slowing the data.
Codemasters F1 2013
Codemasters uses a UDP connection to communicate with the Z1 Dashboard software. First make sure that the Z1 software
is set to scan for the F1 2013 sim. This is done ind the Network tab of the Z1's settings dialog. Second, you will need
to update your hardware_settings_config.xml file for the sim in order to turn on the data feed.
This file is located in Documents\My Games\FormulaOne2013\hardwaresettings.
Find this line:
<motion enabled="true" ip="dbox" port="20777" delay="1" extradata="0" />
and update it to be:
<motion enabled="true" ip="127.0.0.1" port="20777" delay="1" extradata="2" />
If you are having difficulties in connecting, then ensure that your anti virus software or
firewall is not blocking the IP Address or Port. By default these are IP Address 127.0.0.1
and Port 20777. You can change these if necessary in the Network tab of the Z1 Dashboard's settings dialog.
Note that sometimes with Codemasters sims, there can be a delay of data through the UDP connection
making the Z1 Dashboard lag behind by about a second or two. If you find this happening please
make sure you do not have any firewall, anti-virus software, or other devices that might
be filtering or slowing the data.
Dirt Rally 2
Dirt Rally 2 requires editing the hardware_settings_config file to turn on UDP telemetry.
This file is located in documents/My Games/Dirt Rally 2. Open the file in Notepad and look for the
motion_platform section. Edit it to look like the following:
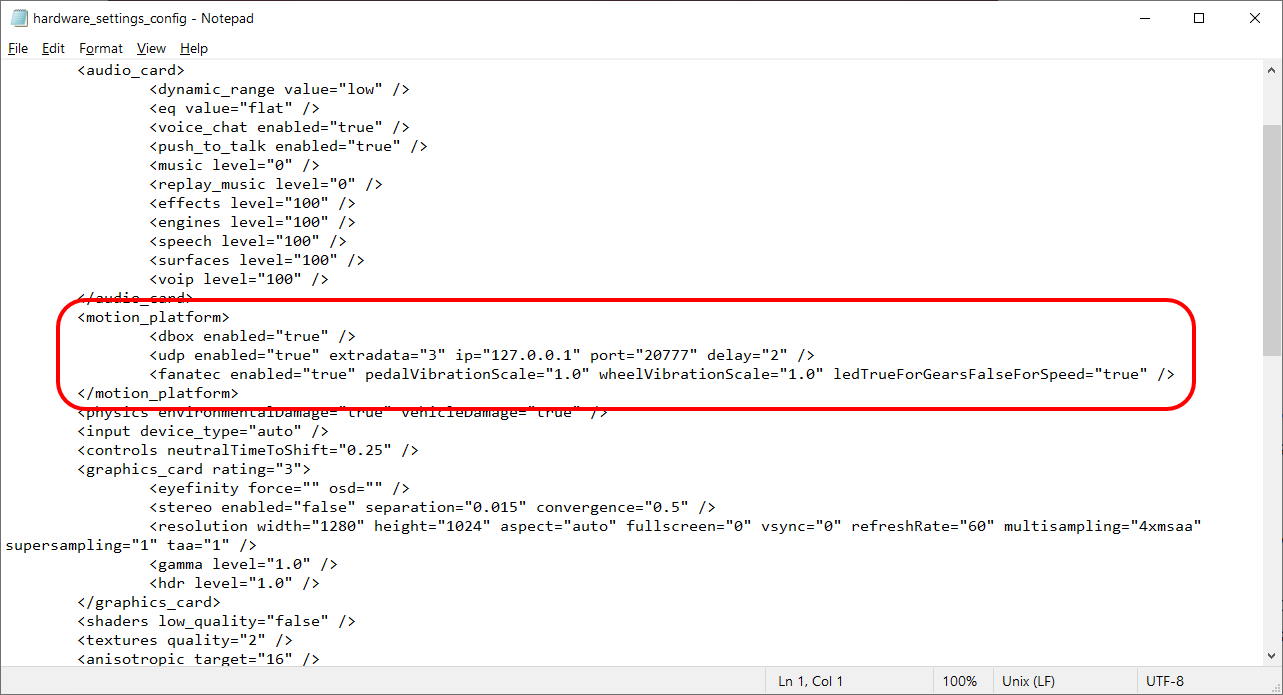
Then in the Z1 Dashboard's Network settings tab select the Dirt Rally 2 option from the Codemasters
drop down:
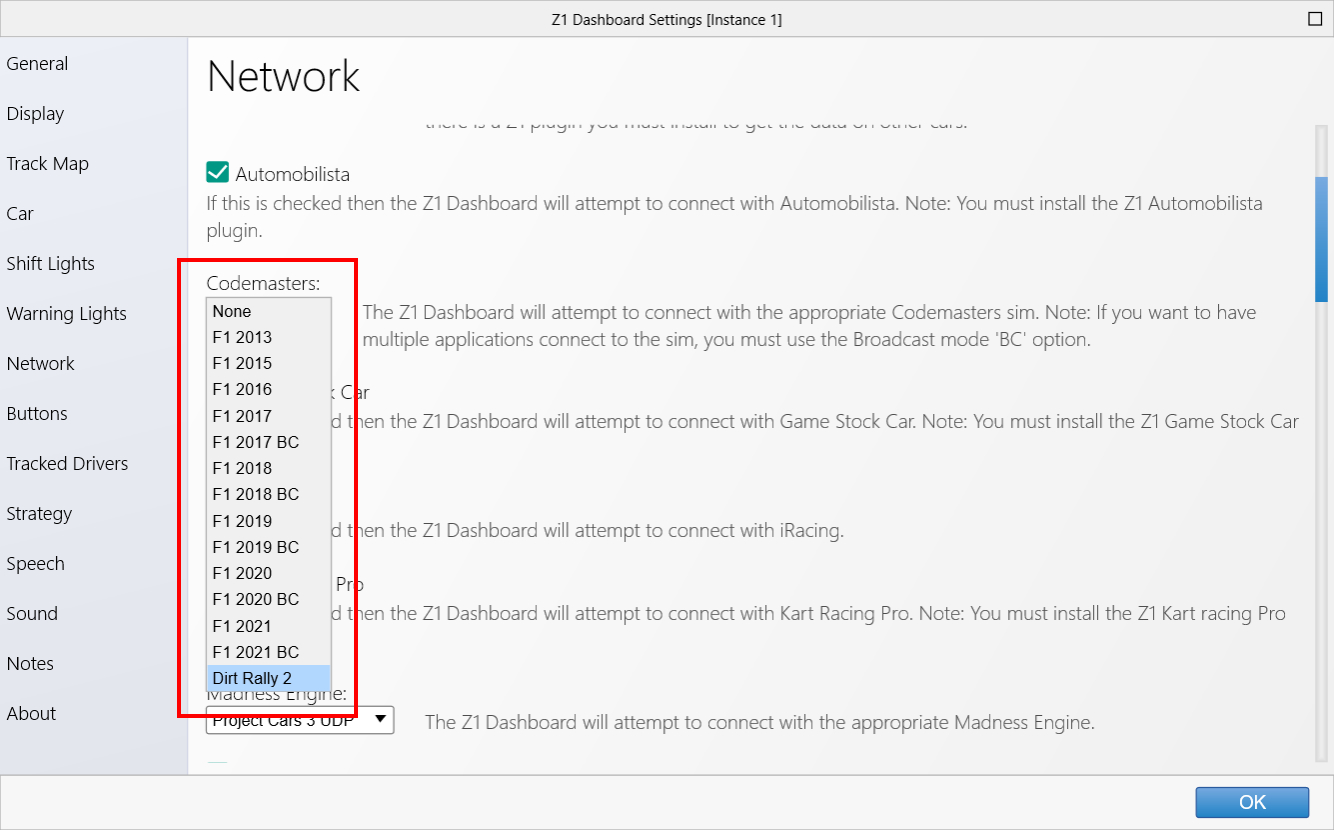
The Codemasters IP and Codemasters Port must match the ip and port that are in the hardware settings file.
This is 127.0.0.1 and 20777 by default.
The sim starts sending telemetry when you are in the car and have engaged the handbrake.
 Manual Index